Showing posts with label virtually vapid. Show all posts

Friday, September 26, 2014

Resize Guest Linux VM

This has happened to me several times, I thought that 20gb would be enough for my Linux virtual machine, but I was so wrong. No problem, just expand the hard drive from the VM manager and then resize the partitions using GParted. Right? Wrong!

As M1k3y would say:

"When in danger, when in doubt, run in circles scream and shout!"

Relax! It is actually quite simple.
  1. Download a liveCD iso of GParted
  2. Change VM disk settings so that the iso is in the CD drive and the CD drive is connected at power on.
  3. Use the VM manager to first defragment the drive then expand it to the desired size.
  4. During BIOS screen use ESC key to select the boot device as the CD drive.
  5. Select all defaults as Debian boots off of the CD, then double click on the GParted icon to start.
  6. GParted
  7. If your unallocated portion is immediately after your main root/boot partition then you're in luck! Click the partition, select resize & move, and drag the right side to fill up the unallocated portion.
  8. If however there is a partition between your old /root and your unallocated portion, you will have to move some stuff around. This is where it gets tricky. If you move /root anywhere, then your computer will boot into grub rescue> and you will have to boot the kernel manually and then reinstall grub.
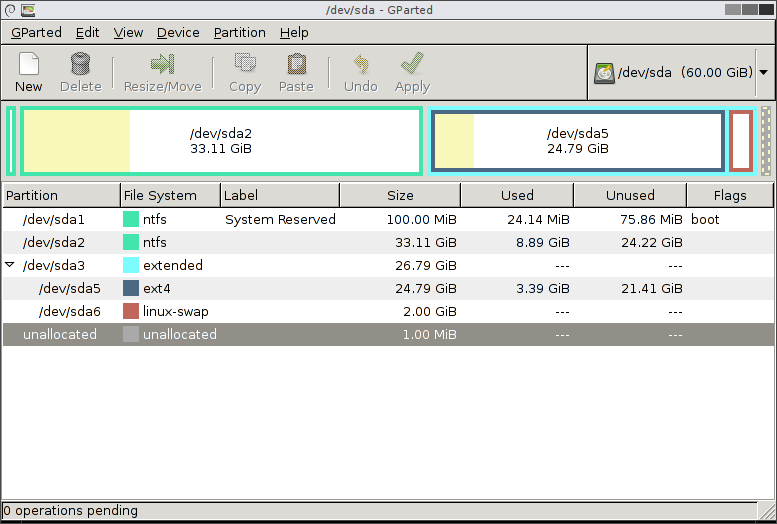
Moving Stuff Around

All of these steps will cause GParted to warn you that your system will probably not boot when you restart. In fact, it definitely won't start because GRUB will have no idea where to find your /root partition. This will cause it to boot into grub rescue, which has just enough commands for you to find and set the root partition and manually boot the kernel. Then you can reinstall grub to make the changes permanent.
  1. To move partitions around, you can copy and delete a partition to move it from the left side to the right side.
  2. For nested partitions, like and extended linux-swap, you can select resize & move to drag the boundary of the extended partition as far into neighboring unallocated portion as you can, then select resize & move again for the linux-swap partition and move it as far into the extended partition as possible and finally drag the opposite side of the extended partition against the linux-swap so that it is the same size as it was originally, but in a new location on the drive.
  3. Finally, now that your unallocated portion is next to the /root partition, resize it to fill the entire drive.

Booting Kernel Manually from GRUB

There are several good references, including several askUbuntu and *Nix StackExchange, but this article by Carla Schroder from the Linux Foundation is superb. The GRUB 2.00 manual is also actually quite helpful if you know where to look. Try section 4.3.
  1. You can use ls to see what drives GRUB sees.
    grub rescue> ls
    (hd0) (hd0,msdos3) (hd0,msdos5) (fd0)
    
    GRUB tells you it sees your hard drive, 2 partitions: /dev/sda3 and /dev/sda5 and a floppy drive.
  2. List the contents of each drive to find the one with /boot. You can drop off the msdos prefix and just use the partition number.
    grub rescue> ls (hd0,3)/
    ./ ../ boot/ etc/ bin/ sbin/ vmlinuz initrd.img ...
    
    You just repartitioned your drive so you already new you moved your root from sda1 to sda3 (for example), so this is just validation. Note the trailing slash /, without it GRUB tells you what type of filesystem it is, eg ext4.
  3. List the contents of /boot and you will see all of the kernels available.
    grub rescue> ls (hd0,3)/boot
    ./ ../ grub/ vmlinuz-3.13.0-30-generic initrd.img-3.13.0-30-generic abi-3.13.0-30-generic System.map-3.13.0-30-generic vmlinuz-3.13.0-36-generic ...
    
    Some Linux distros put a symlink to the linux kernel and ramdisk (initrd) in root which you can use to load them.
  4. Set the root and prefix variables and load the normal module.
    grub rescue> set root=(hd0,3)
    grub rescue> set prefix=(hd0,3)/boot/grub
    grub rescue> insmod normal
    grub rescue> set
    root=hd0,msdos3
    prefix=(hd0,msdos3)/boot/grub
    
  5. Load the linux kernel specifying the location of root, load the ramdisk image initrd.img and boot.
    grub rescue> insmod linux
    grub rescue> linux /vmlinuz root=/dev/sda3
    grub rescue> initrd /initrd.img
    grub rescue> boot
    
    Your machine should boot up. If it boots up but crashes with can't find /etc/fstab, /dev, /sys, /proc and /sbin/init errors and ends up in BusyBox with a (initrmfs) prompt, then you forgot to specify the location of root!
  6. Now for the crucial step, as if everything else wasn't enough, right? Everything you do in GRUB is temporary. In order to fix GRUB you will have to reinstall it. Open a Bash terminal and execute update-grub and then grub-install and you are good to go.
    $ update-grub
    Generating grub configuration file ...
    Found background: /usr/share/images/grub/Apollo_17_The_Last_Moon_Shot_Edit1.tga
    Found background image: /usr/share/images/grub/Apollo_17_The_Last_Moon_Shot_Edit1.tga
    Found linux image: /boot/vmlinuz-3.13.0-29-generic
    Found initrd image: /boot/initrd.img-3.13.0-29-generic
    Found linux image: /boot/vmlinuz-3.13.0-27-generic
    Found initrd image: /boot/initrd.img-3.13.0-27-generic
    Found linux image: /boot/vmlinuz-3.13.0-24-generic
    Found initrd image: /boot/initrd.img-3.13.0-24-generic
    Found memtest86+ image: /boot/memtest86+.elf
    Found memtest86+ image: /boot/memtest86+.bin
    done
    $ grub-install /dev/sda
    Installing for i386-pc platform.
    Installation finished. No error reported.
    
    Note that you are installing GRUB on the hardrive, /dev/sda, not into any partition, so don't use a partition number. Reboot again with your fingers crossed, but you should be back in familiar territory.
Hope this helps! Good luck!

Wednesday, January 16, 2013

Django, PyDev, Virtualenv Setup

[UPDATED 2013-01-16]

Django integration in PyDev for eclipse is sweet, and contrary to what my previous post here said, it is not tricky. Although there must have been some reason I made this post right? The only gotcha for me, is that in addition to selecting your virtualenv as the Python interpreter, you must also select the standard Python lib folder so that threading.py and a few other packages that PyDev uses will be available. Luckily, PyDev gives you a nice warning message when you select a virtualenv that says exactly that.

Now selecting this folder should be straightforward but no real guidance is given because each system is a little different. For example on Ubuntu and system installed Python you would add the /usr/lib/python/ while on Windows using the official Python Windows installer, you would use C:\Python27\lib\. And of course you could use any local version of Python that you built yourself, where ever that might be. The easiest way to locate the correct folder is to find the standard Python libraries, threading.py in particular since PyDev specifically mentions it.

Now originally I also had posted an issue with django-admin.py being confused between the system installed version and the version in a virtualenv, but I have not seen that issue with the latest version of PyDev, and I am also using the global site packages in the virtualenv, which also has a different version of Django than the base install. So ... ?

To sum up, assuming you already have eclipse with PyDev installed:

  1. Install virtualenvwrapper: pip install virtualenvwrapper. This will also install the latest version of virtualenv.
  2. Make your virtualenv: mkvirtualenv myDjangoProject. This will also switch on your virtualenv.
  3. Install django in your virtuenv: pip install django. Also install anything else you want, and/or use toggleglobalsitepackages to turn on/off sitepackages.
  4. In eclipse under the Window menu option select preferences and then from the list of preference settings on the right, select PyDev > Interpreter - Python. Now in the Python Interpreters window, click New, type in a name, then browse to ~/.virtualenv/myDjangoProject/bin/python or %USERPROFILE%\.virtualenvs\be\Scripts\python.exe on Windows, click the open button then OK.
  5. Generally I don't alter or add any folders or built-ins at this next step; I just accept what PyDev tells me I need. However, as discussed above, when using a virtualenv, the standard python library folder must also be added, so do it now. Check the box for either /usr/lib/python/ or C:\Python27\lib depending on your system. If successful, you should be returned to the Python Interpreters window, and you should see your new interpreter listed with the default one. Voila.
Voila! Now you should be able to use the Django integrated submenu options with your PyDev Django projects. You can start an app, run any custom manage.py command, start a Django shell and sync your database. I hope it works for you. Enjoy and happy coding!

Monday, January 7, 2013

Fedora 17 open-vm-tools


[UPDATE 2013-04-24]
This blog post here is now obsolete as open-vm-tools-9.2.2 with Fedora specific scripts is now available (via yum) from Fedora for both Fedora-17, Fedora-18 and soon to be Fedora-19 too.
Also a new stable open-vm-tools (open-vm-tools-9.2.3-1031360) has been released today 2013-04-24. A pseudo list of fixes is on Dmitry Torokhov sf.net page.


[UPDATE 2013-04-08]
Starting in Fedora 18, procps has been replaced by procps-ng. I used a soft symlink to point to libprocps: $ sudo ln -s /usr/lib/libprocps.so /usr/lib/libproc.so You will need to install the dev packages from Fedora.
Also you will have to build using CFLAGS=-Wno-deprecated-declarations to avoid errors from deprecated glib code.
AFAIK neither Fedora 16 nor 17 come with open-vm-tools, the open-source version of vmware-tools provided for guest systems by vmware. Ubuntu and OpenSUSE both have this essential tool in their repositories. In their instructions specifically for Fedora 16/17, vmware says to use the version of vmware-tools that comes with vmware-player, however, if your host machine is too old to run the latest version, then you are SOL because you can only update vmware-tools by updating vmware-player, which is a catch-22. Perhaps fortunately now, you can download current version of vmware-tools if you can figure out which version to use, because only red-hat enterprise is listed.

Fortunately you can build open-vm-tools from source, just make sure you have the dev files from the following packages:

  • gtk
  • pam
  • ... <need to finish this list>
You can install them using `sudo yum install <package>-dev`. As you are building open-vm-tools you will be prompted which dev-packages are missing, so just install and restart.

To build you follow the familiar autotools pattern: `./configure`, `make` and `make install` which will automatically put it in /usr/local/... which is probably the best place for it. I don't recommend ever installing anything into /usr/bin/ or /usr/lib/ because they will probably be overwritten on any updates/upgrades and distribution updates/upgrades. The other option would be either /opt or ~/opt but that is usually reserved for precompiled binaries that are ready to be installed, and placing an add-on software package in ~/opt will only allow the user who installs it to use it, which might be your intent - but I digress.

I had no problems installing the dev packages or building open-vm-tools for my Fedora 17 vm, but when I restarted, the guest tools service isn't running! Of course, because I need to edit my /etc/init.d folder to add open-vm-tools as a service. I'm still working on that part, there are some clues on Fedora's init scripts man page and I've also copied the init.d scripts from Ubuntu's and openSUSE's open-vm-tool scripts. And of course there is also vmware-config-tools.pl which should also provide some more clues. One thought I had was to download one of the newer vmware-tools tarballs for RHEL and see what's in that version vmware-config-tools.pl script.

I was able to start the service manually by executing vmware-user-suid-wrapper but it complains that some of the modules haven't been loaded before logging in. You can load the modules manually too, but the init.d scripts are the right way to go. Even without the modules I can get drag and drop and auto-screen resizing to work just by running vmtoolsd or the aforementioned vmware-user.suid-wrapper. I can also mount my host shared folders using vmware-mounter. If anyone wants to help out, then we will have a very nice packaged version of open-vm-tools for Fedora.

The best online help I've found for open-vm-tools and vmware-tools for linux guests actually has been on the arch-linux site. According to the first few paragraphs you can enable open-vm-tools at boot by using `systemctl start vmtoolsd` and `systemctl enable vmtoolsd`. Trying either of these commands returns `vmtoolsd.service not found`. Bummer. Googling gives these fedora links:
The last of these 3 links seems to confirm that indeed systemctl will automatically add the service for the next boot. However I don't think this takes care of all of the scripts, there are some in /etc/sysconfig. Anyway, it's obvious that you have to have the /etc/init.d or rc.d and /sysconfig scripts to start and enable the service. The vmware-config-tools.pl file from my version of vmware was too old to be relevant. There are rpm's of more current vmware-config-tools, so maybe I'll have a look in there.

Thursday, April 26, 2012

VirtualBox hates small machines

Don't bother installing VirtualBox on a machine with anything less than 2GB of RAM. VMWare Player 3.5 is still downloadable, and works great with older systems. It will run with up to 75% of your physical memory, whereas VirtualBox will not allow you to use more than half. This will let you install Fedora 16 which needs 786MB to install, even LXDE or XFCE. After installation I turned it back down to 512MB.

Otherwise VirtualBox is awesome on new-ish boxes. I have it on my Dell Core 2 Duo (cerca 2007) with 2GB running Ubuntu 12.04LTS.

Tuesday, April 17, 2012

KDE the double deuce of desktops

KDE is so tricked out you might not even be able to install it, let alone run it. It's like Windows 7 for linux. It takes too much ram. Wouldn't install on my VM's. Barely got Ubuntu KDE on VMWare, but wouldn't work on VirtualBox. I did get KDE running on bad, but it's an older version. My 2nd bad KDE experience.

Monday, April 16, 2012

Resize VirtualBox hard disk drive

Numerous post cover how easily this can be done.

$ sudo vboxmanage modifyhd filename --resize size-in-MB

There is a catch, and I'm not sure why, but your VM may not recognize the new unallocated space if there are snapshots, so make a clone first and work with that.

Extending your partition in Windows XP is a little more work. If you are not extending the system partition, Windows XP can handle it using diskpart. Otherwise there are numerous partition managers (listed in no particular order) such as EaseUS Partition Master, Aomei Partition Assistant, Mini Tool Partition Wizard (which also has a live CD for download), and GParted Live. Here's a recent review with a few others.

All of these except the last (two, if you include Mini Tool) must be installed first. I chose GParted Live because I did not want to install any more software on my VM than necessary, and I didn't want to uninstall it either. Also it's easy enough for me to reboot my VM using any ISO image on my host. GParted Live is an ISO image of a mini Debian X11 system with Gparted, the partitioning tool. It has everything you need to manage your partitions on any platform. All of the files in the dependencies for each platform are in the ISO image.

As always there are caveats. Before you edit your partitions obviously back up any data. But you already did that by making a clone of your VM. Now defragment then run CHKDSK /f on your old volume. This is to make sure the disk sectors are properly accounted. Otherwise GParted won't know where they are and will fail. Don't worry, if this happens your disks will not be altered, and GParted tells you to do what I just said above. The rest is pretty obvious.

Thursday, March 29, 2012

Package Predicament Part 3: Python, the final installment

[WARNING: Outdated Material] This post is over a year old, and consequently the ideas, opinions and facts may no longer be relevant or accurate (assuming there were actually facts in this post). Please proceed with caution. You have been warned.

So it turns out that there is a long history between Python and Linux (*). Debian has an official Python Package Policy. This is because Python is an integral part of Linux; Linux libraries depend on Python and Python packages. If you go moving them around, you will break your Linux installation.

One of the main differences you will see are the /lib/site-packages folder is renamed /lib/dist-packages on Linux (* just Ubuntu, see CORRECTION), and the existence of /usr/share/pyshared and /usr/lib/pymodules on Linux as well. I'm not going to pretend I understand everything that's going on, but in a nutshell these are Python modules that Linux is using, for something.

Lucky for you, distribute, setuptools, distutils and pip are tailored for Ubuntu so that they will install packages in the correct locations, and also know where to find them. So in general this supports the argument that you should look for your Python packages from the distro repo, especially pip, distribute, setuptools, distutil, and virtualenv. If you install these from your distro repo, you should be OK (**). And above all, "for the love of Guido," use pip, never easy_install!

[CORRECTION: 2012-04-11] (*) After several adventures with VMs (Fedora16, OpenSUSE 12 and even FreeBSD), I have done some experimentation, and some of these Python-peculiarities are only on Ubuntu/Debian distros. For example, there is no dist-packages folder on either OpenSUSE or Fedora. They both use the traditional Python file structure and name conventions such as site-packages. On Fedora it looks like your packages will go in /usr/lib/Python2.7/site-packages, whether you install them with $ sudo yum install python-package or $ sudo pip-python package. Note: on Fedora pip is pip-python, unless you are using it from a virtualenv, then it's just pip. There's nothing in the /usr/local/lib folder on Fedora remotely related to Python, nor /usr/local/share. I didn't get a chance to look for pyshared or pymodules, which are both in /usr/lib on Ubuntu 11.10, but I did notice that there is a lib-dynload in /python2.7.

So what does this all mean? Well, I tried to install numpy with pip in a virtualenv on Fedora, and it still failed miserably (***), see Package Predicament, Part 2. I've research it a little, there are some old bug reports, and several SO questions, but no good answer. I did not try to install it in the base system, but I'm believe it would fail there, just like it did on my Oneiric Ocelot. I think it's a problem with pip, not virtualenv, and I guess the Numpy setup.py or egg. BTW: it also fails on Windows, no surprise; where's my libgcc? Sorry I don't have the complete MinGW installation, only MsysGit. But of course I can install it using the *.exe all-in-one isntaller from Numpy/Scipy website just fine.

[UPDATE: 2013-01-16] (***) Duh, I needed the dev packages, _obviously_. Do yum/apt-get/zypper install libatlas-dev, ... and make sure you have gfortran. Numpy, SciPy and Matplotlib all build fine with pip in a virtualenv, once you have the proper dev files. Now Windows is an entirely different story, but it can also be done.

[UPDATE: 2012-04-17] (**) You can seriously f*** up your sh** if you start messing around with your distro's version of distribute, distutils or setuptools. For example, Unity's Software Center depends on these to install packages. If you screw up your version of setuptools, Software Center won't even open. My advice is to (1) use virtualenv for any package that you need that differs from your repo's version. For example python-requests is version 0.5 in Oneiric Ocelot, but newest version of Requests is (as of now) 11.1, so you should create a virtualenv and install it there. (2) Only pip Python packages that are pure Python, that are not in your repo, and do not let them install dependencies that are already installed by your repo. For example, Requests now requires chardet >=1.0.0, which because Ubuntu's version of chardet is named oddly 2.0.1-2 causes pip to replace it with the exact same code. Probably fine, but not smooth. (3) If your desired package has dependencies that already exist in the repo, then use virtualenv and install them there. (4) Put a simlink to packages that require compiled code, such as Numpy in your virtualenv site-packages folder.

Tuesday, March 20, 2012

Virtually vapid

[UPDATED 2016-02-23] Now I'm swinging back to VirtualBox on both systems as the overall King of VM. Unfortunately VMWare Player 7 on my Windows machine was freezing up randomly and at one point just refused to work. It turns out that there have been a lot of changes with VirtualBox in the last 4 years, and now not only does VirutalBox include hardware virtualization but it also has valid certs for Windows. Previously there were some scary messages along the lines of, "use at your own risk," which obviously goes without saying so ... why were they saying it? Anyway, the newest VirtualBox 5 is super fast and so far stable. In addition to these obvious performance perks, the fact that VirtualBox is really free, as in FOSS, means that there are tons of great features like cloning and snapshots, and the license allows commercial use with no restrictions. The VMWare player restricts VMWare Player to non-commercial use only, and it was a free lite version of the more powerful VMWare Workstation, so lite on features. So, for now, I'm really happy!

I did it. I installed a Windows VM on Ubuntu using VirtualBox and Ubuntu VM on Windows using VMware 3.1.5 (the PC was too old for 4.0.2). VirtualBox was a breeze and fast, but VMware and Ubuntu took forever (*). You have to install VMware Tools (**) which takes like a million years. It's probably my ancient laptop and the out-of-date VM, but that was the best I could do for now. What's the point? There is no point, it's just cool.
P.S. 99% of problems are solved by cycling vm, shut it down; not sleep.
P.P.S. "user$ sudo ./vmware-install.pl"  (**) since you need root access and your extracted vmware-tools folder is not on your path. "user$ sudo ./bin/vmware-uninstall.pl" to remove.
Update (2012-03-21): (**) Preferred method is to use open-vm-tools from package manager since it updates with your Linux distro. Use apt-get, Synaptic or Ubuntu Software Center. In other words do not use VMware Tools.
Update (2012-03-22): After installing your guest on VirtualBox VM, install guest-additions, to get video, mouse and other drivers. If you're on Ubuntu, use the iso image in the Software Center.
Update (2012-03-23): (*) OK, I've changed my opinion a little bit, after spending an embarrassing number of hours updating from XP to SP3 for the guest VM on the Linux host. What I'm getting at is that installing the guest Linux VM was a lot faster, even though the initial XP install was pretty fast, getting the updates is painfully slow. This is a good time to make a bullet list of lessons learned:

  1. VMware >3 only works on machines with Hardware Assisted Virtualization like Intel VT-x.
  2. VirtualBox works on anything.
  3. If installing a guest Linux VM using VMware, do not download VMware Tools from the internet. Instead use package manager (apt-get, Synaptic or Ubuntu Software Center) to install open-vm-tools package.
  4. If installing VirtualBox on Linux host, use package manager and install virtualbox-qt and virtualbox-guest-additions-iso (which is the VirtualBox equivalent of VMware Tools).
  5. For best performance, install on a system with at least 2GB of RAM and >2 core processor. Although it will work on a single core with 1GB, you noticeably see performance suffer, and you make experience system hangs or BSOD.
  6. If installing a guest Windows XP VM, turn off automatic updates and instead use Windows XP Service Pack 2 Network Installation Package for IT Professionals and Developers followed by Windows XP Service Pack 3 Network Installation Package for IT Professionals and Developers. Otherwise you will spend a very long time waiting for downloads and installing them.
  7. Do not overtax your host machine during critical guest installations, e.g. installing OS. Think of rooting your phone - although the stakes are not as high, you want everything to go alright so you don't have to repeat the entire process on a new VM. It's also a good idea to kill your screensaver/lock/sleep feature on your host during crucial installs, otherwise your hard-drive might turn off.
  8. After installing guest OS, don't forget to run either open-vm-tools for VMware from the package manager or virtual-box-guest-additions-iso for VirtualBox from the devices menus option on your VirtualBox VM after you've downloaded it package manager.
Fork me on GitHub